Vision – Do you see what I see?
Neuroscientists and computer vision researchers aim to create tech that identifies objects by simply “looking”, but how can computers learn such human behavior?
Let’s get started!
So what is it we want to do?
When wanting to analyze an image, we actually have three major tasks we need to perform
1 – The Asks:
That is, finding out what is in the image and what we want to know about it. In Vision terminology, these are called requests.
2 – The Machinery:
In the next step, Vision machinery will serve as request handler and provide us with a result.
3 – The Result:
The result will be called an observation – what Vision observed in this image. These observations depend on what we asked Vision to do in the first place.
So, how do we approach this challenge? How do we make Vision see what we want it to see? Here’s when the coding comes in!
Step 1: Capturing video frames from the camera
Before we can do any Vision magic we need to obtain the image we want to run the Asks on. We will need to get the necessary frames from our camera by using AVFoundation:
- Create a new Single View Application
- Navigate to the ViewController.swift file, import AVFoundation and Vision
- Import AVFoundation
- Import Vision
- In the viewDidLoad, add the method setupVideoCaptureSession() which will create our AVCaptureSession object, that will handle capture activity and manage the data flow between input devices (such as the camera) and outputs.
let videoCaptureSession = AVCaptureSession() - Check if we have a camera available for video capture
guard let camera = AVCaptureDevice.default(for: .video) else { fatalError("No video camera available") } - Create the capture input from our camera and wire it up as input to our video capture session
do { videoCaptureSession.addInput(try AVCaptureDeviceInput(device: camera)) } catch { print(error.localizedDescription) }videoCaptureSession.sessionPreset = .high
This sets the session to output at the highest resolution – we may want to experiment with different resolutions, especially if our model only processes low resolution images.
Now, that we have our input set up, we can get started on how to output what the camera is capturing.
- Add a video output to our capture session
- Setup video output
let videoOutput = AVCaptureVideoDataOutput() videoOutput.setSampleBufferDelegate(self, queue: DispatchQueue(label: "videoQueue")) videoOutput.alwaysDiscardsLateVideoFrames = true videoOutput.videoSettings = [kCVPixelBufferPixelFormatTypeKey as String: kCVPixelFormatType_32BGRA] - Wire up the video output to the video capture session
This creates the video output and wires it up for our session.
- Set ourselves as delegate for handling frames being captured
- Set up a queue for processing video frames
- Tell the video output to discard frames that we aren’t fast enough to handle and then set the format of the output that we want to process
- Mind the orientation: Computer Vision algorithms are sensitive to orientation so we have to pass that in by making sure to set our project to only portrait and specify portrait mode for video output
let connection = videoOutput.connection(with: .video) connection?.videoOrientation = .portrait - Add the capture session output as a sublayer to our view
- Add capture session output as a sublayer to the view controllers’ view
let previewLayer = AVCaptureVideoPreviewLayer(session: videoCaptureSession) previewLayer.frame = view.frame view.layer.addSublayer(previewLayer) - Now we are ready to start the flow from inputs to outputs
AVCaptureVideoDataOutputSampleBufferDelegate func captureOutput(_ output: AVCaptureOutput, didOutput sampleBuffer: CMSampleBuffer, from connection: AVCaptureConnection) {
Step 2: Obtain the images
To obtain what the camera is seeing, we need to gain access to the captured frames. To do so we need the ViewController to conform to AVCaptureVideoDataOutputSampleBufferDelegate
videoCaptureSession.startRunning()which will get called every time a frame is captured by the camera.
Our last task is to update our Info.plist to include an entry for “Privacy – Camera Usage Description”. We will add the implementation of the captureOutput at the end.
Step 3: Where the magic happens, wiring up Vision and CoreML
We will use a model that must be able to take in an image and give us back a prediction of what the image is. Apple has made available various sample models here. Although they use InceptionV3 in their keynote demo app, I chose ResNet50 as I’ve found it to be more accurate.
Once we’ve downloaded ResNet50, drag and dropped it into Xcode (making sure we’ve checked the “Copy if necessary” checkbox). It will automatically generate the necessary classes, providing us with a swift interface to interact with our model. This is all done by CoreML. We can now use the Vision framework to pass images to this model for processing:
- Ask Vision to classify the image for us by passing it to a handler handleClassifications (which we will see next)
- Create a Vision request that applies the bundled Resnet50 Core ML model, by loading up the model and creating the request
lazy var classificationRequest: VNCoreMLRequest = { // load the Resnet50 ML model through its generated class and create a Vision request for it. do { let resNet50Model = try VNCoreMLModel(for: Resnet50().model) // set up the request using our vision model let classificationRequest = VNCoreMLRequest(model: resNet50Model, completionHandler: self.handleClassifications) classificationRequest.imageCropAndScaleOption = .centerCrop return classificationRequest } catch { fatalError("can't load model: \(error)") } }() - Set the VNImageCropAndScaleOptionCenterCrop as our model requires a square image of 244×244 pixels
We then need to handle the classifications, which is where Vision gives us The Results.
The ML model request’s completion handler provides VNClassificationObservation objects, indicating what classification the model applied to the image and its confidence regarding that classification.
We want to display these classifications on our screen
let imageRequestHandler = VNImageRequestHandler(cvPixelBuffer: pixelBuffer, orientation: .upMirrored) do { try imageRequestHandler.perform([classificationRequest]) } catch { print(error) }Step 4: The last wire
Our final step is to update captureOutput method from the AVCaptureVideoDataOutputSampleBufferDelegate for it to process the camera image with our Vision request.
- First we need to get pixels from the sampleBuffer
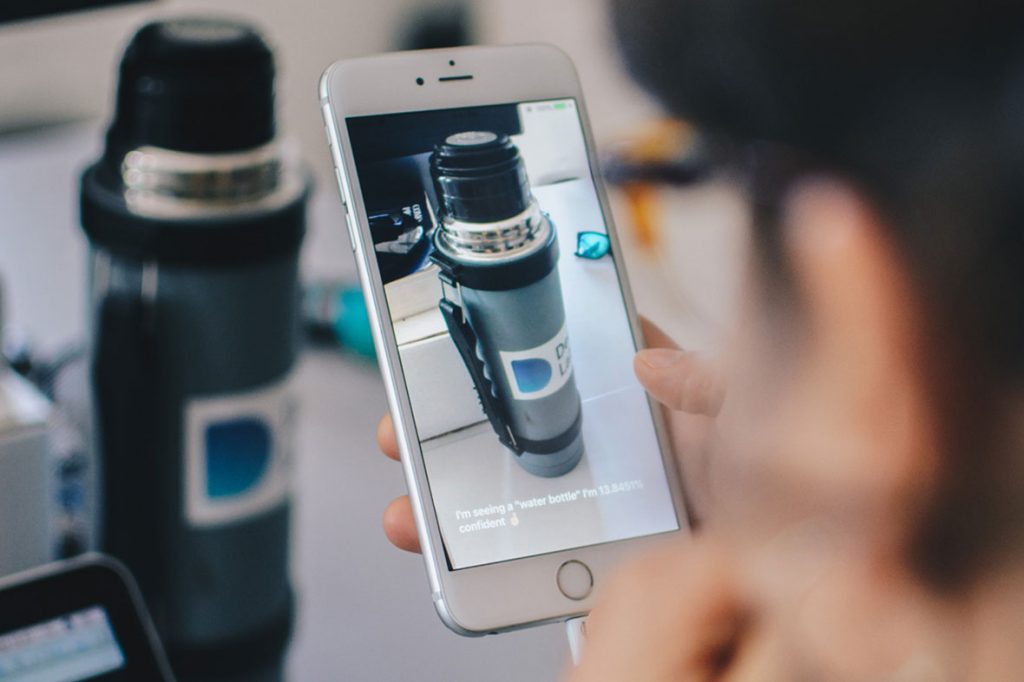
func handleClassifications(request: VNRequest, error: Error?) { guard let observations = request.results as? [VNClassificationObservation] else { fatalError("unexpected result type from VNCoreMLRequest") } guard let best = observations.first else { fatalError("can't get best result") } DispatchQueue.main.async { self.resultLabel.text = "I'm seeing a \"\(best.identifier)\" I'm \(best.confidence * 100)% confident" } } - And finally, we can kick off our Vision requests using VNImageRequestHandler
guard let pixelBuffer = CMSampleBufferGetImageBuffer(sampleBuffer) else { return }
Go ahead and run your app… and… Voilá!
You can download the sample code here https://github.com/HelOlhausen/VisionDemo